Tuesday 21 June 2016

Latar Belakang :
  • Manusia suka lupa
  • Mau menggunakan komputer yg berpassword eks orang lain yang sudah pergi jauh.
  • Iseng aja
Persiapan :
  • Installer windows (jangan cemas, hanya untuk membuka aja bukan install ulang)
  • Komputer
  • Sabar
Langkah :
  • Boot komputer dengan installer windows.
  • Pilih 'recovery / repair mode'
  • Pilih 'repair your computer'
  • Pilih 'restore your computer using a system image that your created earlier'
  • Pilih 'Cancel'
  • Pilih 'Command Prompt'
  • Ketik D:
  • Masuk ke folder windows\system32 : cd windows\system32
  • Backup file sethc.exe : rename sethc.exe sethc_ori.exe
  • Copy cmd.exe to sethc.exe : copy cmd.exe sethc.exe
  • Exit
  • Restart komputer dengan mode normal
  • Setelah layar login muncul (tentu saja masih dengan password) tekan tombol shift 5 kali, maka akan muncul windows command
  • Check user existing : net user
  • Reset password user dimaksud : net user --namauser-- *
  • Tekan enter 2 kali
  • Password telah ter-reset, silahkan login tanpa perlu memasukkan password lagi.
Catatan :
  • Bisa diaplikasikan untuk windows versi lain dengan menyiapkan installer versi tersebut.
Silahkan dicoba dengan segala resikonya -:) 

Wednesday 16 September 2015

Latar Belakang :
  • Android IMO S88 Discovery yg lagi idle. 
  • Ingin upgrade ke seria android yg lebih tinggi (yg masih dimungkinkan)

Bahan dan tools pendukung :
  • Android IMO S88 Discovery
  • Aplikasi Framaroot

Langkah
  • Nyalakan HP
  • Install framaroot (bisa dari google play langsung atau download dulu versi terakhir di situs framaroot copy ke hp dan install)
  • Saat muncul windows aplikasi framaroot pilih SuperSU atau Superuser lalu tekan Boromir
  • Reboot HP (matikan dan nyalakan lagi)
  • Selesai

Thursday 16 July 2015

Latar belakang :
  • Install / reinstall OS;
  • Banyak komputer atau lebih tepatnya laptop yg tidak disertai pemutar cakram / cd-rom / dvd-rom;
Kelengkapan yg diperlukan :
  • USB stick
  • Disk / GParted;
  • Unetbootin;
  • File bootable OS dlm format ISO;
Kendala :
  • Unetbootin release baru tidak detect USB dlm format NTFS padahal beberapa OS (baca : xindxxx) mensyaratkan USB stick dlm format NTFS;
Langkah :
  • Jalankan software Disk / Gparted
  • Format USB stick dengan format FAT32 (jangan tutup software)
  • Jalankan UNetbootin dan pilih file ISO yg diinginkan
  • Pilihlah alamat USB yg diinginkan (karena USB diformat dalam format FAT32 maka akan terdeteksi)
  • Biarkan unetbootin dlm kondisi tersebut dan JANGAN TEKAN TOMBOL "Ok"
  • Kembali ke software Disk / GParted yg masih berjalan
  • Format ulang USB stick dengan format NTFS
  • Edit partisi dan buatlah menjadi bootable (partion >> flags)
  • Kembali ke program UNetbootin dan tekan "Ok"
  • Tunggu sampai proses instalasi selesai.

Wednesday 4 March 2015

Latar belakang :
  • editor scripting dg kemampuan lengkap
  • tersedia PPA yg terintegrasi dg unity

Langkah :
  • buka terminal
  • tambahkan repo komodo-edit dan update 
sudo add-apt-repository ppa:mystic-mirage/komodo-edit
sudo apt-get update
  • install komodo-edit
    sudo apt-get install komodo-edit

Thursday 19 February 2015

Part 1: Determining your Edition and whether your License is OEM/Retail from System

In order to perform a successful installation you need to use the .iso which matches the version in system properties.

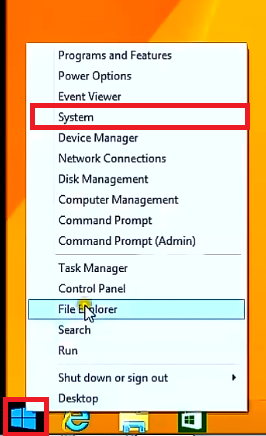
The easiest way of determining what edition your product key is when the previous installation can boot is by right clicking the start button (or pressing [Windows] and [x]) and then selecting system:
winx
If you have Windows 8.0, there is no Start Button so you may press the [Windows] and [Pause|Break] key to launch system.
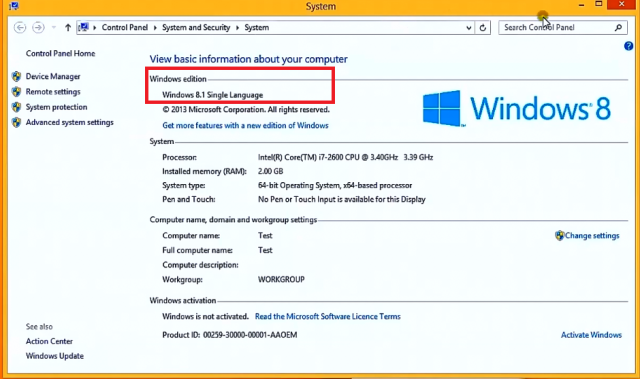
Your Windows 8.1 “Edition” will be listed at the top. let say like this one

Windows8.1SL


Also look at the product ID at the bottom and see if the product ID mentions the words OEM. If the license is OEM then your product key will reside within the system UEFI/BIOS. If on the other hand your license does not mention OEM, you should have the product key in a confirmation email or in retail packaging.
Unfortunately one of the Editions itself is called “Windows 8.1″. This is a marketing flop which causes huge user confusion during installation as the entire product family is referred to as “Windows 8.1″. It would have been better for Microsoft to name this Edition Windows 8.1 Home. I will therefore state Windows 8.1 “Edition” to denote a variant in the Windows 8.1 Product Family as using “Windows 8.1″ will lead to confusion.
Ironically Windows 8.1 Single Language product keys are interchangeable between different Languages. Therefore you can change the language during installation but cannot change it after installation (without resorting to a total clean installation).
If the Edition you have is Windows 8.1 with Bing or Windows 8.1 Single Language with Bing then Microsoft have not provided a .iso for you and you cannot follow this guide to download installation media. Please add votes to my Windows Uservoice suggestion so Microsoft can improve the Windows Media Creation Tool.
If you have the Edition Windows 8.1 Professional with Media Centre see additional notes in Part 5.

Part 2. The Windows 8.1 Media Creation Tool

The Windows 8.1 Media Creation Tool can be downloaded from here and allows for selection of language, 5 Editions and also architecture:
This tool gives a Windows 8.1 “Edition” with Update 1 .iso.
Retail Notes:
These new Windows 8.1 with Update 1 “Edition” .isos will accept both Retail Windows 8 “Edition” and Windows 8.1 “Edition” product keys during installation. Product activation will occur automatically upon first connection to the internet.
OEM Notes:
The tool itself does not require entry of a product key to download the installation media. The Windows 8.1 with Update 1 “Edition” .iso will automatically input OEM UEFI/BIOS Embedded System Locked Preinstallation Windows 8.0 “Edition” and Windows 8.1 “Edition” keys. Product activation will occur automatically upon first connection to the internet. There is thus no longer any need to use a third party utility to obtain your product key.
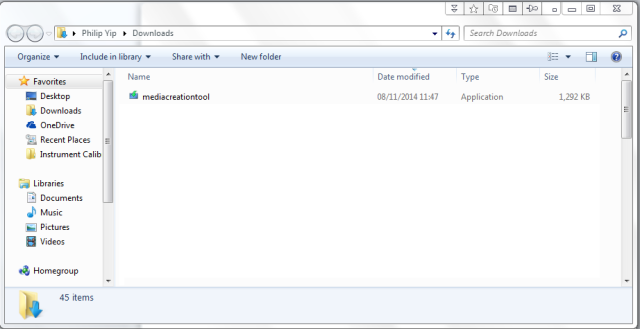
Double click the mediacreationtool
1
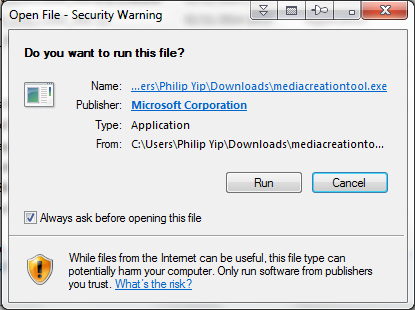
Select Run
2
The downloader will load displaying the Windows logo:
3
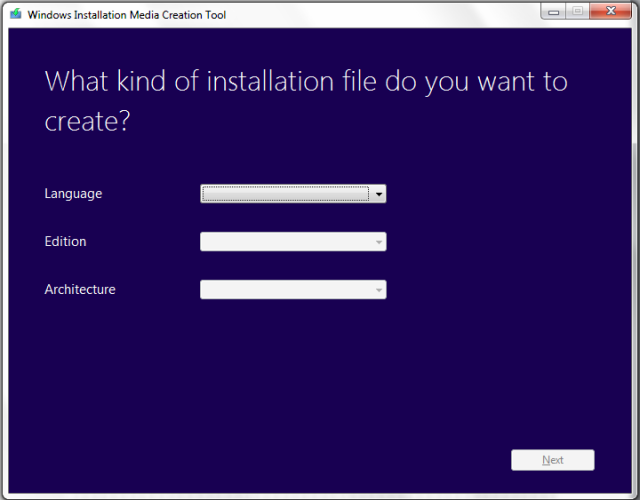
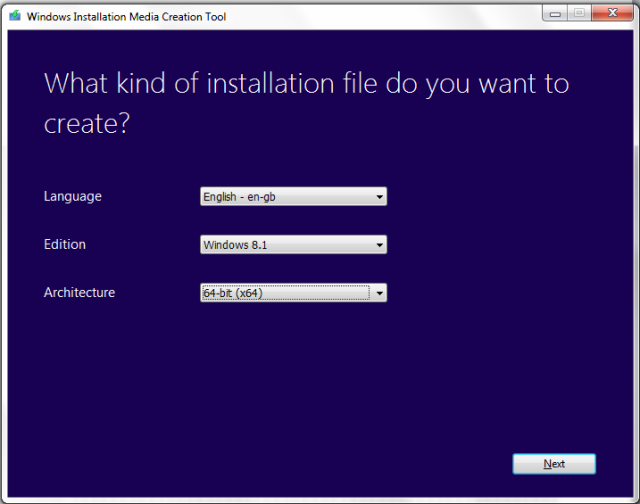
You will asked for Language, Edition and Architecture:
4
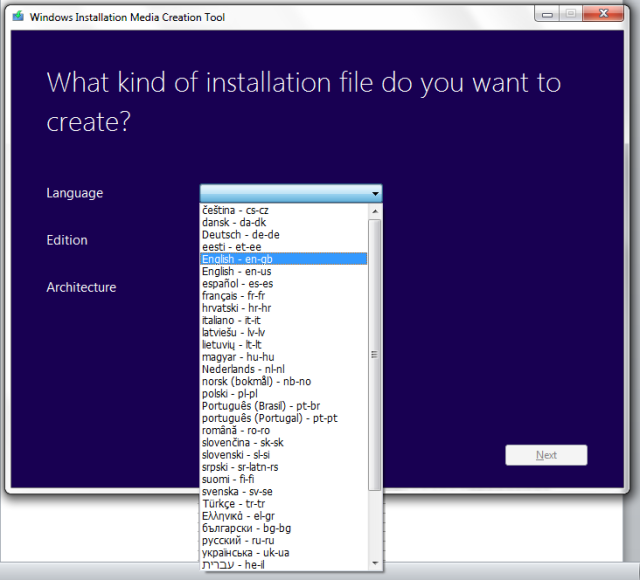
Microsoft offer a large assortment on languages as shown, pick your desired language.
I’m going to select “proper English” i.e. “English – en-gb”:
5
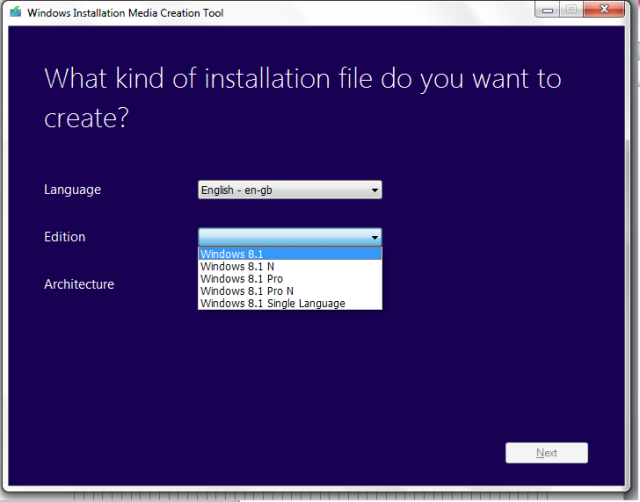
You will then be prompted for your Windows Edition – in this case I am going to select Windows 8.1:
6
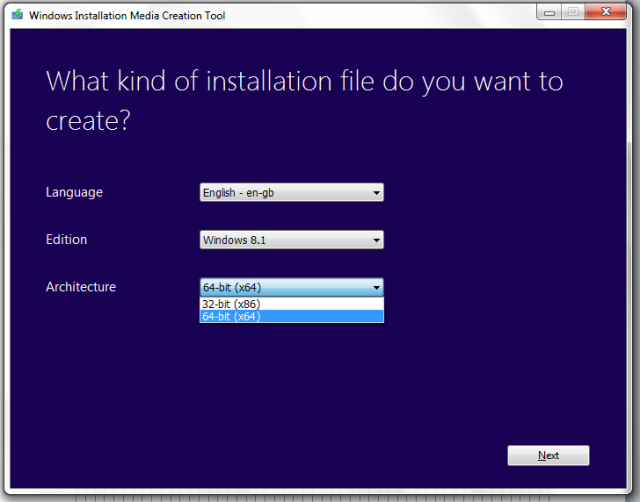
Then you will be prompted for your architecture. I’m going to select the 64 Bit version, in most cases the 64 Bit version should be selected.
The 32 Bit version should only be used for legacy applications or weaker hardware such as tablets.
7
When you have selected your 3 desired options select next:
8
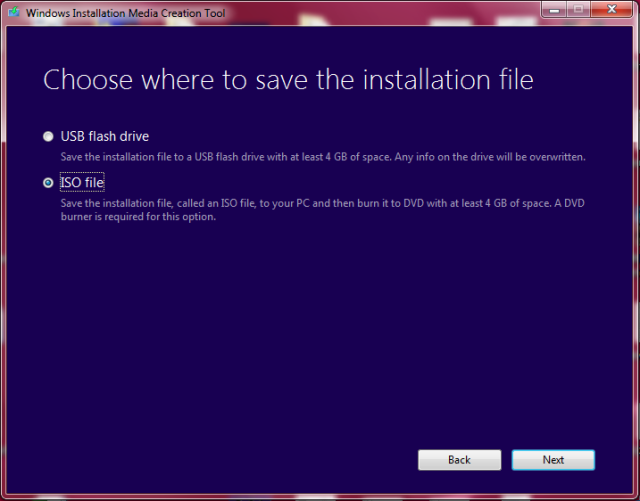
Then select to save the .iso file and select next:
9
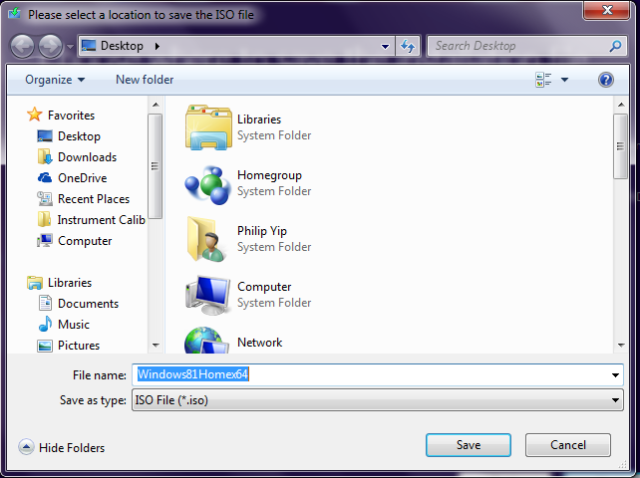
Select the location to save and name of your .iso and select next:
12
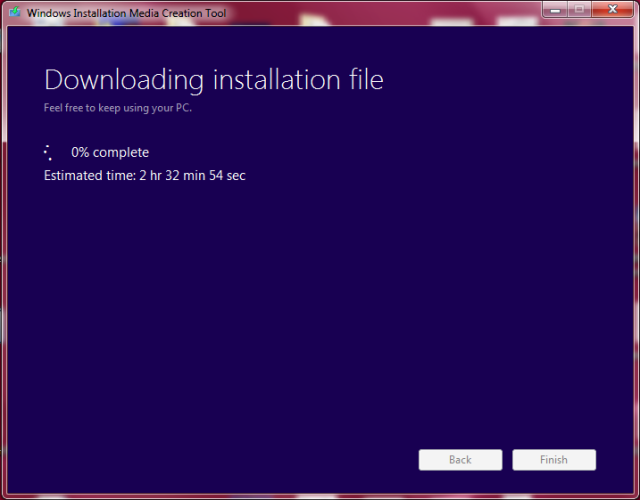
The .iso will download:
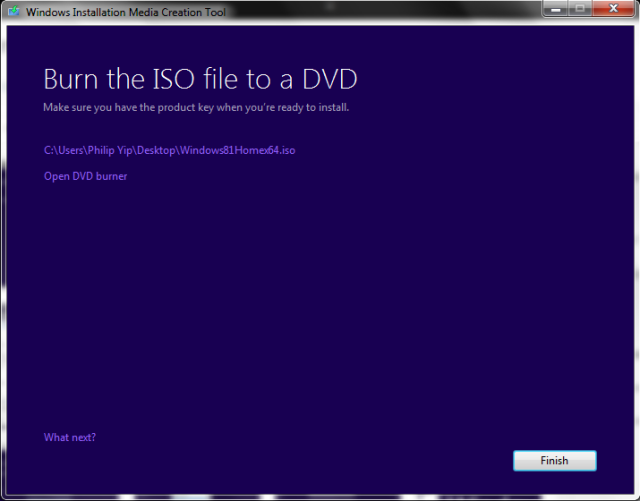
14


17
Once you .iso is saved select Finish.
If you want to download another Edition or Architecture simply launch the media creation tool again.

(original link)

You need to backup and restore an activation because every time you format and reinstall Windows you need to activate Windows again.
This tutorial explains how to backup and restore an activation license of Windows 8 & 8.1. For activation you look for a valid MAK key, calling Microsoft or waiting for a KMS server to go online etc. Sometimes when you activate Windows with a previous key then you have a problem with activation and get the error message "This key has limit of activation".

But if you want to reinstall Windows and don't want to lose the activation then you can create a backup of the activation and then reinstall Windows then restore the activation. This activation method backs up and restores the Windows 8 & 8.1 activation as well as Microsoft Office activation.

Method 1: Handy Backup and Restore Activation License of Windows 8 & 8.1(NO software required)
This method only works on the same machine, the same Windows edition. Before activation, the machine hardware should not be changed.

Step 1
Go to -> "C:\Windows\System32\spp\" and COPY to the "store" folder and save it on another drive. The store folder may be hidden so first enable "Show hidden files and folders".


Step 2

Now reinstall Windows. The Windows edition must be the same.

Step 3

After reinstalling Windows, open a command prompt as Administrator and type "slmgr -upk" and press Enter. A message will be shown "Product key successfully uninstalled".


Step 4

Restart your computer in safe mode; for that go to the search box or hold Windows button and press R button then type "msconfig" and press Enter.

Step 5

The System Configuration window will be opened. In this window go to the boot tab and enable "safe boot" then click on "OK".


Step 6

After restarting Windows in Safe Mode run a command prompt as Administrator and type "net stop sppsvc" to stop the Software Protection Platform service and press Enter. Sometimes you can get a message that it's already stopped and not running.

Step 7

Go to "C:\Windows\System32\spp\" and REPLACE the current "store" folder with the backed "store" folder in the step 1

Step 8

Now restart Windows in normal mode using "msconfig" and open a command prompt as Administrator and type "slmgr.vbs -ato" and press Enter. Your Windows will be activated!


Thanks for :
 tips and tricks forum

Friday 2 May 2014

installed software : server lamp, phpmyadmin

browse for http://localhost --> ok running well

browse for http://localhost/phpmyadmin --> error/not fount (*huftf)

troubleshot :
1. Edit apache2.conf (do this first)
sudo gedit /etc/apache2/apache2.conf

2. add this line somewhere
Include /etc/phpmyadmin/apache.conf

3. restart apache.
/etc/init.d/apache2 restart
 
 
solved dech
 
selamat menyalurkan hobby !!!! 

Blog Archive

Breaking News

Popular Posts